|
|
 Oreo Pizza There’s a pizza company who used to make this dessert pizza. I’ve deconstructed it to marshmallow creme, frosting and oreo cookies.
Frosting:
1/2 stick butter
1 cup powdered sugar
1 pkg Oreo cookies, broken into quarters, thirds and halves
1 pizza dough *
1 jar (7 ounces) marshmallow creme
Can do the frosting night before:
Microwave butter for 15 seconds. Let rest 10 minutes. Beat until smooth. Add powdered sugar and stir, gently at first, then until smooth. Let rest 5 minutes and then stir some more to make it fluffy. (You could do this with an electric mixer and skip the resting.)
Preheat oven to 400F or according to directions, if using a premade pizza dough. Spread out pizza dough, starting at center, on a standard round pizza pan. Prebake crust for 8-10 minutes, until it’s just starting to brown. Remove from oven.
Spread frosting over pizza; it will be melty, but that’s ok! Sprinkle broken cookies over frosting. Bake 6-10 min or until golden brown around edge.
Melt marshmallow in microwave on HIGH 25 seconds, stir well. Drizzle (or slosh, as pictured above) over pizza.
* Click here to see the recipe I use for pizza dough. Pictured is a Pillsbury Artisan Pizza Crust that we spread out to fit a round pan.
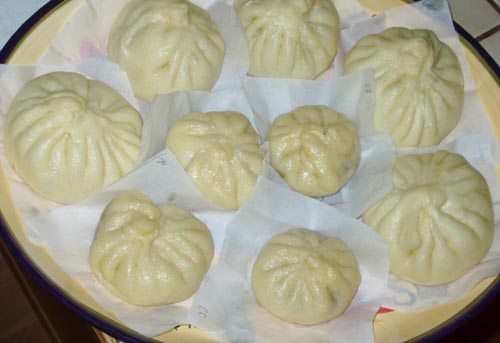 Banh bao are the larger ones, and the kaliji bao are the smaller ones. Our Daring Cooks’ December 2011 hostess is Sara from Belly Rumbles! Sara chose awesome Char Sui Bao as our challenge, where we made the buns, Char Sui, and filling from scratch – delicious!
Total time: 3 hours.
Makes 20.
Filling Ingredients
1 pound of chicken meat, cooked, diced
2 T curry powder
1/2 onion, diced
2 cloves garlic, minced
2 cm ginger, minced
2 T oyster sauce
2 T oil
1 T cornstarch
1/2 c chicken broth
1/2 tsp 5 spice
1/2 c finely chopped cilantro (optional)
3 Tbsp coconut milk (optional)
Bun Ingredients
1 cup milk, scalded
¼ cup (60 gm/2 oz) sugar
1 tablespoon oil
¼ teaspoon (2 gm) salt
2½ teaspoons (8 gm/1 satchel) of dried yeast
3 cups (420 gm/15 oz) plain flour
Filling Directions:
1. Heat the vegetable oil in a wok or pan. Sauté the onions for one or two minutes until soft. Add garlic and ginger to the wok/pan and cook another 2 minutes.
2. Add diced chicken to the wok/pan and stir. If using coconut milk, add it here and completely coat the chicken.
3. Add oyster sauce, curry powder and 5 spice to the chicken mixture, stir fry for one minute.
4. Mix cornflour and stock together and then add to the chicken mixture.
5. Stir well and keep cooking until the mixture thickens, 1 or 2 minutes.
6. Remove from the heat and stir in the cilantro. Transfer to a bowl and set aside to cool completely before using. The filling can be prepared up to 2 days in advance, covered with plastic wrap, and refrigerated.
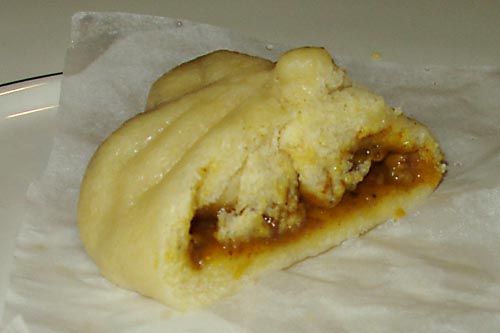 Probably should have used more filling for this batch. Bun Directions:
1. Scald milk and then stir in sugar, oil and salt, leave to cool until it is lukewarm. Once it is the right temperature add yeast, leave until yeast is activated and it becomes frothy, about 10 – 15 minutes.
2. Sift flour in to a large bowl.
3. Add milk/yeast mixture to the flour. Bring the flour mixture together with your hands.
4. Place dough on a lightly floured surface and knead for approximately 10 minutes. The dough should be smooth and slightly elastic.
5. Place in a lightly oiled bowl and cover with a damp cloth. Leave to rise until it is double in size. This will take from 1 – 2 hours depending on weather conditions.
6. Punch down dough and divide in to 20 equal portions.
7. Roll each dough portion in to a 7 – 8cm (2¾ – 3 ¼ inches) round.
8. Place 1 tablespoon of filling in the centre of the round, gather the edges together at the top and place on a 8cm (3 inch) square of baking paper. Repeat until all dough has been used.
9. Cover and let rise for 20 minutes.
10. Place buns in bamboo steamer, leaving space between the buns.
11. Heat water in a wok until it is simmering and place steamers one on top of each other in the wok.
12. Place lid on top bamboo steamer and steam for approximately 12 minutes.
I have not tried these with coconut milk, since I liked it just fine without it. I’ve done them with and without cilantro, and I’ve tried it with both chicken and pork (pork filling was a little more substantial than the pictured chicken filling that seemed sort of flat). Chicken with cilantro, sans coconut milk, is by far the best route.
I originally found this on the LA Times archived recipes as “Gali Ji Bao”, and I said “hah! Golly Jee Bow”, so I had to make it. Glad I did, too; these were the boy’s favorite out of the bunch.
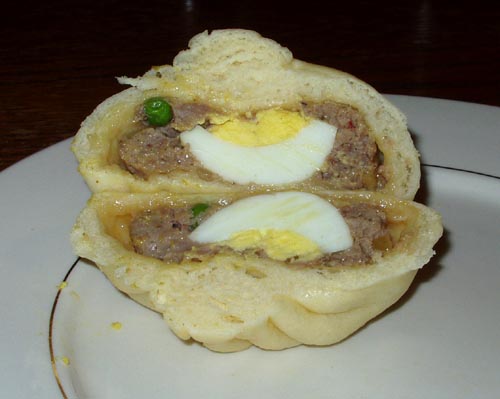 Bánh Bao Our Daring Cooks’ December 2011 hostess is Sara from Belly Rumbles! Sara chose awesome Char Sui Bao as our challenge, where we made the buns, Char Sui, and filling from scratch – delicious!
Total time: 3 hours.
Makes 16.
1/2 pound ground pork, ground chicken, or ground turkey
1/2 small onion, chopped
1 clove garlic, chopped
3 eggs, hardboiled, peeled, and quartered lengthwise
Chinese sausage, sliced thinly on the diagonal into coins
about 2 tsp sugar
2 tsp fish sauce (optional)
1/2 cup peas (optional)
Bun Ingredients
1 cup milk, scalded
¼ cup (60 gm/2 oz) sugar
1 tablespoon oil
¼ teaspoon (2 gm) salt
2½ teaspoons (8 gm/1 satchel) of dried yeast
3 cups (420 gm/15 oz) plain flour
Bun Directions:
1. Scald milk and then stir in sugar, oil and salt, leave to cool until it is lukewarm. Once it is the right temperature add yeast, leave until yeast is activated and it becomes frothy, about 10 – 15 minutes.
2. Sift flour in to a large bowl.
3. Add milk/yeast mixture to the flour. Bring the flour mixture together with your hands.
4. Place dough on a lightly floured surface and knead for approximately 10 minutes. The dough should be smooth and slightly elastic.
5. Place in a lightly oiled bowl and cover with a damp cloth. Leave to rise until it is double in size. This will take from 1 – 2 hours depending on weather conditions.
6. Punch down dough and divide in to 16 equal portions.
7. Roll each dough portion in to a 3 1/2 inches to 4 inches round.
8. For each bánh bao, roll out dough. Put approximately 1 tbsp of raw ground meat in center, top with egg quarter, and press 3-5 slices of Chinese sausage around the meat. Pleat dough around and around, gathering edges together on top. Pinch to seal well. Repeat until all dough has been used. Place on 4 inch square of parchment paper. Let rest 20 minutes.
9. Place buns in bamboo steamer, leaving space between the buns.
10. Heat water in a wok until it is simmering and place steamers one on top of each other in the wok.
11. Place lid on top bamboo steamer and steam for approximately 15 minutes.
Bánh Bao are typically made with quail eggs, but I don’t have access to those, so I just used some quartered chicken eggs. You can substitute andouille sausage and a pinch of crushed red pepper for the Chinese sausage, but it’s not quite the same.
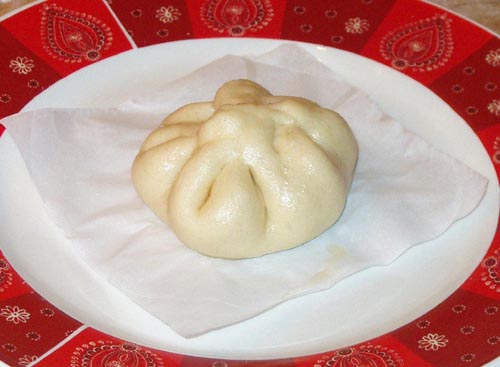 Char Sui Bao Our Daring Cooks’ December 2011 hostess is Sara from Belly Rumbles! Sara chose awesome Char Sui Bao as our challenge, where we made the buns, Char Sui, and filling from scratch – delicious!
Requires Char Sui.
Total time: 3 hours + 24 hours for Char Sui.
Makes 20.
Filling Ingredients
350 gm (12 oz) char sui (finely diced)
2 shallots (finely diced)
1 tablespoon dark soy sauce
2 tablespoons oyster sauce
1 teaspoon sesame oil
¼ cup (60 ml) chicken stock
1 teaspoon (3 gm) cornflour
½ tablespoon vegetable oil
Bun Ingredients
1 cup milk, scalded
¼ cup (60 gm/2 oz) sugar
1 tablespoon oil
¼ teaspoon (2 gm) salt
2½ teaspoons (8 gm/1 satchel) of dried yeast
3 cups (420 gm/15 oz) plain flour
Filling Directions:
1. Heat the vegetable oil in a wok or pan. Sauté the shallots for one or two minutes until soft.
2. Add diced char sui to the wok/pan and stir.
3. Add oyster sauce, dark soy sauce and sesame oil to the pork mixture, stir fry for one minute.
4. Mix cornflour and stock together and then add to the pork mixture.
5. Stir well and keep cooking until the mixture thickens, 1 or 2 minutes.
6. Remove mixture from wok/pan and place in a bowl to cool. Set aside until ready to use.
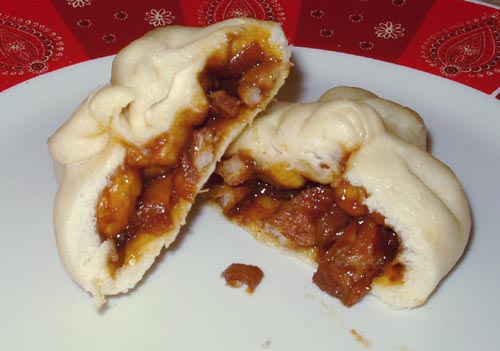 Char Sui Bao Bun Directions:
1. Scald milk and then stir in sugar, oil and salt, leave to cool until it is lukewarm. Once it is the right temperature add yeast, leave until yeast is activated and it becomes frothy, about 10 – 15 minutes.
2. Sift flour in to a large bowl.
3. Add milk/yeast mixture to the flour. Bring the flour mixture together with your hands.
4. Place dough on a lightly floured surface and knead for approximately 10 minutes. The dough should be smooth and slightly elastic.
5. Place in a lightly oiled bowl and cover with a damp cloth. Leave to rise until it is double in size. This will take from 1 – 2 hours depending on weather conditions.
6. Punch down dough and divide in to 20 equal portions.
7. Roll each dough portion in to a 7 – 8cm (2¾ – 3 ¼ inches) round.
8. Place 1 tablespoon of filling in the centre of the round, gather the edges together at the top and place on a 8cm (3 inch) square of baking paper. Repeat until all dough has been used.
9. Cover and let rise for 20 minutes.
10. Place buns in bamboo steamer, leaving space between the buns.
11. Heat water in a wok until it is simmering and place steamers one on top of each other in the wok.
12. Place lid on top bamboo steamer and steam for approximately 12 minutes.
I tried a variety of doughs for the steamed buns, and the listed recipe gave the best first night results. If overcooked, it didn’t hold up very well, though. So don’t overcook! These froze and steamed (plus five minutes) very well.
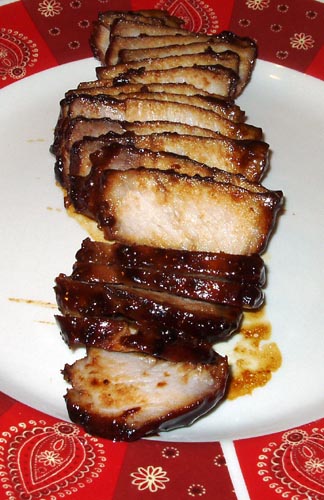 Char Sui (Barbecued Pork) Our Daring Cooks’ December 2011 hostess is Sara from Belly Rumbles! Sara chose awesome Char Sui Bao as our challenge, where we made the buns, Char Sui, and filling from scratch – delicious!
Total time: 24 hours.
1 pork fillet/tenderloin (roughly 1-1.5 pounds)
4 large cloves of garlic, crushed
1 teaspoon (3 gm) ginger, grated
1 tablespoon peanut oil
1 ½ tablespoons maltose (you can substitute honey)
1 ½ tablespoons honey
2 tablespoons hoisin sauce
1 tablespoon light soy sauce
1 tablespoon dark soy sauce (I used Thai sweet soy sauce.)
1 teaspoon oyster sauce
1 tablespoon shaoxing cooking wine (I used sake.)
½ teaspoon (2 gm) ground white pepper
pinch of salt
½ teaspoon (2 gm) five spice powder
½ teaspoon sesame oil
½ teaspoon pillar box red food coloring
1. Trim the pork loin to remove fat and tendon and slice lengthways so you have two long pieces, then cut in half. By cutting the pork in to smaller pieces to marinate you will end up with more flavorsome char sui. If you want to leave the pork in one piece you can do this as well. Place in container that you will be marinating them in.
2. Combine all the other ingredients in a bowl and mix well to combine. I placed my maltose in the microwave for a few seconds to make it easier to work with. Maltose is quite a solid hard sticky substance.
3. Cover pork well with ⅔ of the marinade mixture. Marinate for a minimum of 4 hours, I find it is best left to marinate overnight. Place the reserved ⅓ portion of the marinade covered in the fridge. You will use this as a baste when cooking the pork.
4. Place marinated pork loin on the grill of your BBQ.
5. Cook on a medium heat, approximately 15 minutes, until cooked through. Brush with reserved marinade.
6. Be careful to watch that you don’t burn the pork.
It’s cold here, so I pan fried, and I’m not ashamed.
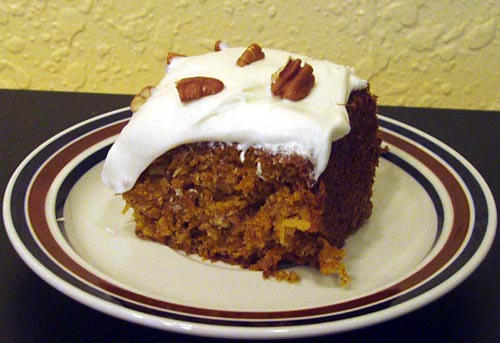 Carrot Cake Adapted from Joy of Cooking.
Total time: About 2 hours.
2 large carrots (2 cups grated carrots)
1 cup all-purpose flour
1 cup sugar
2/3 cup vegetable oil
2 large eggs
1 tsp baking soda
1 tsp baking powder
1 tsp cinnamon
1 tsp salt
1/4 tsp nutmeg
1/2 cup chopped nuts (optional)
1/2 cup shredded coconut (optional)
Preheat oven to 325F.
Combine flour, baking soda, baking powder, and spices, set aside. Grate your carrots using the small holes on the cheese grater (if you haven’t already).
Cream together oil and sugar until slightly fluffy. Add eggs and mix until smooth. Slowly add flour mixture and mix until smooth. Add grated carrots, nuts and coconut (if using) and combine well.
Bake in a greased pan for 60-80 minutes or until a toothpick inserted in the middle comes out mostly clean.
Frosting: estimated 1:4:1 mix of cream cheese, powdered sugar and brown sugar, plus 1 tsp vanilla extract
I put my pecans on top instead of inside the cake. And yes, I served this for breakfast. It actually tasted better chilled (and the frosting set beautifully).
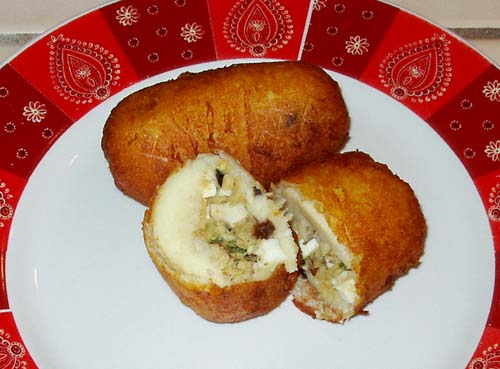 Papas Rellenas de Pescado (potatoes stuffed with fish) Kathlyn of Bake Like a Ninja was our Daring Cooks’ March 2011 hostess. Kathlyn challenged us to make two classic Peruvian dishes: Ceviche de Pescado from “Peruvian Cooking – Basic Recipes” by Annik Franco Barreau. And Papas Rellenas (de carne) adapted from a home recipe by Kathlyn’s Spanish teacher, Mayra.
Total time: About 3 hours.
Ingredients
For the dough:
2¼ lb (1 kg) russet potatoes
1 large egg
For the filling:
2 tablespoon (30 ml) of a light flavored oil
½ lb (250 grams) ground (minced) beef (I used flaked cod)
6 black olives, pitted and chopped (use more if you love olives)
3 hard boiled large eggs, chopped
1 small onion, finely diced (about 1 cup (240 ml))
½ cup (120 ml) (90 gm) (3 oz) raisins, soaked in 1 cup (240 ml) boiling water for 10 minutes, then minced
1 finely diced aji pepper (ok to sub jalapeño or other pepper – if you are shy about heat, use less)
2 cloves garlic, minced or passed through a press (if you love garlic, add more)
1 teaspoon (5 ml) (4 gm) (1/8 oz) ground cumin (use more if you like cumin)
½ teaspoon (2.5 ml) (2 gm) (1/16 oz) sweet paprika
¼ c. white wine, water or beef stock for deglazing
Salt and pepper to taste
For the final preparation:
1 large egg, beaten
1 cup (240 ml) (140 gm) (5 oz) all-purpose flour
Dash cayenne pepper
Dash salt
1 cup dry (240 ml) (110 gm) (4 oz) or fresh (240 ml) (60 gm) (2 oz) bread crumbs (you can use regular, panko, make your own or use store-bought)
Oil for frying (enough for 2” (50 mm) in a heavy pan like a medium sized dutch oven)
Directions
In order to save time, you can boil the potatoes, and while they are cooling, you can make the filling. While that is cooling, you can make the potato “dough.” In this way, little time is spent waiting for anything to cool.
For the dough:
1. Boil the potatoes until they pierce easily with a fork. Remove them from the water and cool.
2. Once the potatoes have cooled, peel them and mash them with a potato masher or force them through a potato ricer (preferred).
3. Add egg, salt and pepper and knead “dough” thoroughly to ensure that ingredients are well combined and uniformly distributed.
While the potatoes cool down before finishing the dough, you can make the filling:
1. Gently brown onion and garlic in oil (about 5 minutes).
2. Add the chili pepper and sauté for a couple more minutes.
3. Add ground beef and brown.
4. Add raisins, cumin and paprika and cook briefly (a few seconds).
5. Deglaze the pan with white wine.
6. Add olives and cook for a few moments longer.
7. Add hard boiled eggs and fold in off heat.
8. Allow filling to cool before forming “papas.”
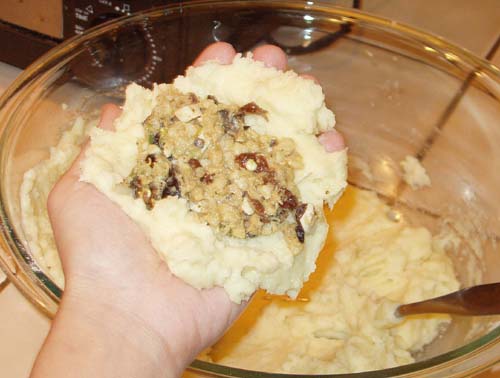 Papas Rellenas de Pescado (before closing and frying) Forming and frying the papas:
1. Use three small bowls to prepare the papas. In one, combine flour, cayenne and salt. In the second, a beaten egg with a tiny bit of water. Put bread crumbs in the third
2. Flour your hands and scoop up 1/6 of the total dough to make a round pancake with your hands. Make a slight indentation in the middle for the filling.
3. Spoon a generous amount of filling into the center and then roll the potato closed, forming a smooth, potato-shaped casing around the filling. Repeat with all dough (you should have about 6 papas).
4. Heat 1 ½ – 2 inches (4 – 5 cm) of oil in a pan to about 350 – 375° F (175 – 190°C).
5. Dip each papa in the three bowls to coat: first roll in flour, then dip in egg, then roll in bread crumbs.
6. Fry the papas (in batches if necessary) about 2-3 minutes until golden brown. Flip once in the middle of frying to brown both sides.
7. Drain on paper towel and store in a 200ºF (95ºC) (gas mark ¼) oven if frying in batches.
8. Serve with salsa criolla (or other sauce of preference) immediately.
I was too chicken to try the ceviche (I’m not ready yet!), so I thought I’d combine the challenge and make potatoes stuffed with fish instead of ground beef. This was incredibly tasty, and they cook fast in the deep fryer. It definitely needs the salsa criolla or some other tangy sauce if you do fish. Sour cream and hot sauce just didn’t cut it.
I put a pair of jalapenos in there, too, but I didn’t even remotely feel them because of all the potato. The filling needs to be a little saltier and spicier than you want it before you surround it in potatoes to fry.
 Eggs Benedict Jenn and Jill challenged The Daring Cooks to learn to perfect the technique of poaching an egg for the December 2010 Daring Cooks’ Challenge. They chose an Eggs Benedict recipe from Alton Brown, Oeufs en Meurette from Cooking with Wine by Anne Willan, and Homemade Sundried Tomato & Pine Nut Seitan Sausages (poached) courtesy of Trudy of Veggie num num.
Total time: 1 hour
4 eggs
2 English muffins
4 slices of Canadian bacon/back bacon (or plain bacon if you prefer)
Salt and vinegar (for poaching)
Hollandaise Sauce
Chives, for garnish
1. Fill a medium saucepan halfway with water and bring to a simmer.
2. Add salt and a splash of vinegar (any kind will do). I added about a tablespoon of vinegar to my small saucepan (about 3 cups of water/720 ml of water), but you may need more if you’re using a larger pan with more water.
3. Crack eggs directly into the very gently simmering water (or crack first into a bowl and gently drop into the water), making sure they’re separated. Cook for 3 minutes for a viscous but still runny yolk.
4. While waiting for the eggs, quickly fry the Canadian/back bacon and toast your English muffin.
5. Top each half of English muffin with a piece of bacon. Remove the eggs with a slotted spoon, draining well, and place on top of the bacon. Top with hollandaise and chopped chives.
 Poached Egg on Eggs Benedict
 Hollandaise Sauce on top of Eggs Benedict Jenn and Jill challenged The Daring Cooks to learn to perfect the technique of poaching an egg for the December 2010 Daring Cooks’ Challenge. They chose an Eggs Benedict recipe from Alton Brown, Oeufs en Meurette from Cooking with Wine by Anne Willan, and Homemade Sundried Tomato & Pine Nut Seitan Sausages (poached) courtesy of Trudy of Veggie num num.
Total time: 35 minutes
3 large egg yolks
1 tsp. (5 ml) water
¼ tsp. (1 ¼ ml/1½ g) sugar
12 Tbl. (170 g/6 oz.) unsalted butter, chilled and cut in small pieces
½ tsp. (2 ½ ml/3 g) kosher salt
2 tsp. (10 ml) freshly squeezed lemon juice
Pinch cayenne pepper (optional)
Directions:
1. Fill a medium saucepan halfway with water and bring to a simmer.
2. Cut the chilled butter into small pieces and set aside.
3. Whisk egg yolks and 1 tsp. (5 ml) water in a mixing bowl large enough to sit on the saucepan without touching the water (or in top portion of a double boiler). Whisk for 1–2 minutes, until egg yolks lighten. Add the sugar and whisk 30 seconds more.
4. Place bowl on saucepan over simmering water and whisk steadily 3–5 minutes (it only took about 3 for me) until the yolks thicken to coat the back of a spoon.
5. Remove from heat (but let the water continue to simmer) and whisk in the butter, 1 piece at a time. Move the bowl to the pan again as needed to melt the butter, making sure to whisk constantly.
6. Once all the butter is incorporated, remove from heat and whisk in the salt, lemon juice, and cayenne pepper (if using).
This is slow, time consuming and absolutely perfect. The general principle for Hollandaise sauce is 1 egg to 4-6 Tbsp of butter. The only thing I might change for me is dropping down to 10 Tbsp of butter, as I felt it was a little too buttery with my 12 Tbsp of butter (I use only real salted butter). Once on top of my Eggs Benedict, I didn’t notice so much.
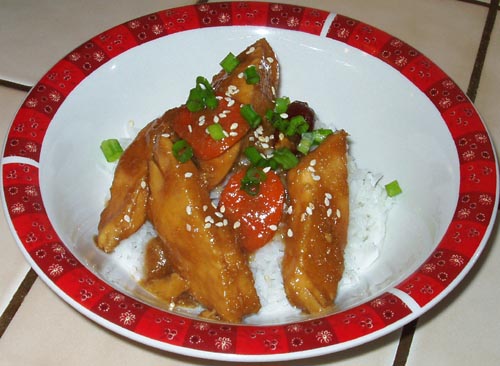 Tea-Infused Teriyaki Chicken Sarah from Simply Cooked was our November 2011 Daring Cooks’ hostess and she challenged us to create something truly unique in both taste and technique! We learned how to cook using tea with recipes from Tea Cookbook by Tonia George and The New Tea Book by Sara Perry.
Total time: 1 hour, plus optional marinade time
2 bags Stash’s Licorice Spiced Tea
2 cups boiling hot water
6 cloves garlic
1/2 cup fresh ginger root
3/4 cup firmly packed brown sugar
2 Tbsp soy sauce
1 Tbsp peanut oil or vegetable oil
Steep tea in hot water for 3-5 minutes. Remove and squeeze tea bags, discard.
In a food processor or blender, combine tea and remaining ingredients. Blend until smooth. ***
Boil sauce in a large pan on medium-high for 20-30 minutes until reduced.
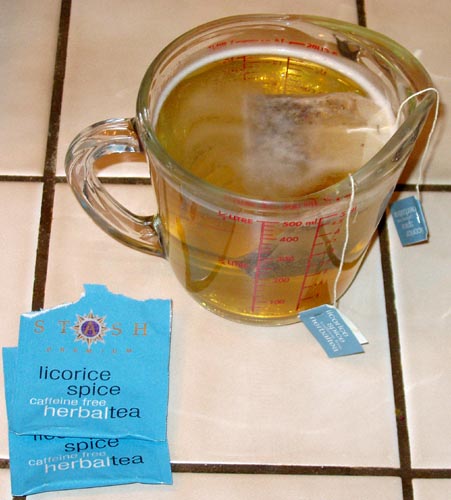 Stash's Licorice Spice Tea
*** At this point, you could add 4 lovely Szechuan peppers and 1 pound of chicken to marinate in the refrigerator. I marinated my chicken, then boiled the whole lot down, added some carrots, and served it on steamed rice.
As it is, it’s just a sweet teriyaki sauce; it’s not even very salty. If you want sweet & salty, add more soy sauce. If you want sweet & spicy (which worked great for me), add some peppers; four Szechuan peppers didn’t make it very hot to me, but you might find it warm enough.
|
|


