|
|
 Curried beef with vegetables on rice Total time: Approximately 1 hour.
The July 2010 Daring Cooks’ Challenge was hosted by Margie of More Please and Natashya of Living in the Kitchen with Puppies. They chose to challenge Daring Cooks to make their own nut butter from scratch, and use the nut butter in a savory recipe.
1 pound sliced beef
14 ounces (1 can) coconut milk
2/3 cup peanut butter or other nut butter*
1 carrot, sliced or julienned
1/2 bushel of fresh spinach, rinsed well
1/4 cup Thai red curry paste or more to taste
1/4 cup soy sauce (or 2 Tbsp fish sauce)
1/4 cup loose (not packed) brown sugar
1 Tbsp chopped onions (optional)
1 Tbsp vegetable or other oil
* To make your own nut butter, process in a food processor an amount of nuts equal to double what the recipe requires. In this case, I used 1.5 cups of salted, unshelled peanuts, and processed until a smooth paste formed. Some nut butter might require oil (to process and make smooth) and salt (to taste).
This is a stirring-constantly stir fry.
Heat oil in a large skillet on medium-high. Add onions (it should sizzle) and cook until clear or golden brown, 3-5 minutes. Add sliced beef and cook until brown on all sides, 2-3 minutes. Add curry paste and mix well until all pieces of meat are coated.
Add carrots, coconut milk (remember to shake it before opening it!), and peanut butter. Stir well. Add soy sauce and brown sugar, mix well, and cook until it just starts to boil. Cover and reduce heat to low, cooking until the carrots are tender or desired doneness, 5-10 minutes. If you like your carrots firm, skip the reduction.
Add spinach and stir well until the spinach wilts and is completely covered in sauce.
Serves 4-6.
This is a little more sauce than there is food to coat, so if you have more vegetables, you should probably add them.
The flavor of your red curry paste will vary, so use caution if you don’t like a lot of heat. I never put seafood anything in my curry paste, and I always use the full amount of peppers, because you never know if you’ll get “lame duck” peppers instead of the good hot kind you really want.
 Army of Pot Stickers Total time: Plan on 2 hours your first time.
Adapted from Real Vegetarian Thai by Nancie McDermott.
3/4 c cooked mashed potatoes
3/4 c cooked mashed sweet potatoes
15-20 Ritz crackers, crumbled
2 green onions (scallions), finely chopped
1/3 c cilantro, finely chopped
1 egg
1 tsp soy sauce
1/2 tsp curry powder
1/4 tsp sugar
1/4 tsp salt
gyoza (or wonton) wrappers or dough
3-4 Tbsp vegetable oil for frying
1-2 c vegetable stock
water for fingertips
In a large bowl, mix together potatoes, cracker crumbs, onions, cilantro, egg and seasonings.
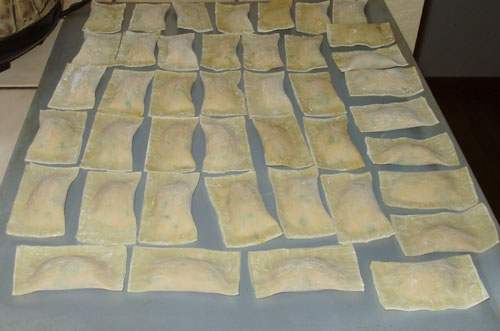
Place two teaspoons to one tablespoon of filling in the center of each wrapper and fold the dough in half, pleating the edges along one side.
Heat 1-2 Tbsp of vegetable oil in a large frying pan (preferably one with a snug-fitting lid) on medium-high heat. Arrange as many pot stickers as you can in the frying pan, and fry until bottoms are golden (2-3 minutes). Add 1/4 cup vegetable stock and cover quickly and tightly. Cook until the water has boiled itself away (about 3 minutes). Repeat for remaining pot stickers.
I served this with double soy sweet and sour sauce and white rice. (Go there to see a picture of the cooked pot stickers.)
I can fit 11-12 dumplings in my frying pan, if I’m using wonton wrappers. This exact recipe made 42 dumplings for me.
Daring Cooks can reference the pot sticker challenge from June 2009 for more information on homemade gyoza dough, details on pleating and alternative cooking instructions.
 Curried Pot Stickers with Double Soy Sweet & Sour Sauce Total time: Less than 5 minutes.
1 Tbsp sweet soy sauce
1 Tbsp soy sauce
2 Tbsp tamarind paste
2-3 Tbsp lemon juice
2-3 tsp brown sugar
1/8 tsp ground ginger
1/8 tsp garlic powder
1/8 tsp curry powder
1/8 tsp crushed red chili peppers
Mix well, warm or room temperature.
I didn’t really measure any of this, I just kind of dumped in and flavored it to taste to match the curried pot stickers.
 Pork Satay III The January 2010 DC challenge was hosted by me, and I chose a delicious Thai-inspired recipe for Pork Satay with Peanut Sauce from the book 1000 Recipes by Martha Day.
I picked this recipe for the DC challenge because it’s what I was cooking some 8 hours after offering to be the last-minute host, three days before the challenge was to be posted. The focus of this challenge is to marinade.
Total time: 40 minutes, plus marinade time.
1/2 small onion, chopped
2 garlic cloves, crushed
1 Thai dragon (bird’s eye) chili pepper
2 T ginger root, chopped (4 cm cubed)
2 T lemon juice (1 oz or 30 mls)
1 T soy sauce (0.5 oz or 15 mls)
1 T fish sauce (0.5 oz or 15 mls)
1 tsp ground coriander (5 mls)
1 tsp ground cumin (5 mls)
1/2 tsp ground turmeric (2-2.5 mls)
2 T vegetable oil (or peanut or olive oil) (30 mls)
1 pound of pork (loin or shoulder cuts) (16 oz or 450g)
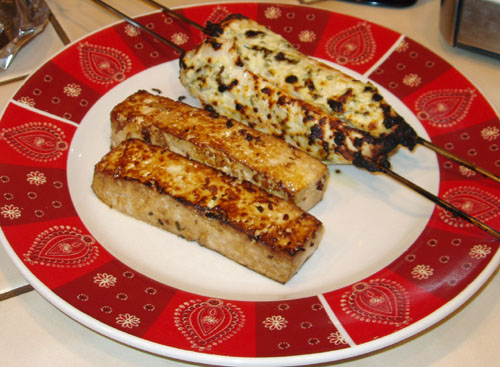
 Pan-fried tofu satay and broiled chicken satay Directions:
1. Cheater alert: If you have a food processor or blender, dump in everything except the pork and blend until smooth. Lacking a food processor, I prefer to chop my onions, garlic, ginger and peppers really fine then mix it all together in a medium to large bowl.
2. Cut pork into 1 inch strips.
3. Cover pork with marinade. You can place the pork into a bowl, cover/seal and chill, or place the whole lot of it into a ziplock bag, seal and chill.
4. If using wooden or bamboo skewers, soak your skewers in warm water for at least 20 minutes before preparing skewers.
5. Gently and slowly slide meat strips onto skewers. Discard leftover marinade.*
6. Broil or grill at 290°C/550° F (or pan fry on medium-high) for 8-10 minutes or until the edges just start to char. Flip and cook another 8-10 minutes.
* If you’re grilling or broiling, you could definitely brush once with extra marinade when you flip the skewers.
Shown above with peanut sauce.
 TexMex Pork Satay I also did this challenge using my trusty Pork Satay II marinade on tofu, pan fried (middle picture), chicken satay marinated in raita (shown with tofu), and the experimental but oh-so-wonderful TexMex Pork Satay marinated in a Chevy’s inspired chipotle and jalapeno cream sauce.
I also did all three dipping sauces suggested in the challenge (peanut sauce, Thai pepper dip, tamarind dip, with changes), as well as using the TexMex dip and my favorite raita.
 Universal Thai Dip - fish sauce and peppers Total time: Less than 5 minutes.
4 Tbsp soy sauce (2 oz or 60 mls)
1 Tbsp lemon juice (0.5 oz or 15 mls)
1 tsp brown sugar (5 mls)
1-2 dried red chilies, chopped (keep the seeds for heat)
1 finely chopped green onion (scallion)
Mix well. Serve chilled or room temperature.
Substitute fish sauce for soy sauce and Thai dragon (bird’s eye) chili for the dried red chili.
 Pork and cabbage stir fry Total time: Approximately 40 minutes, plus rice or pasta cook time.
1 lb pork
1/2 head of cabbage, sliced
1 onion, sliced
1 carrot, julienne sliced
3 Tbsp tamarind paste
2 Tbsp ginger root, julienne sliced or minced
2 Tbsp peanut oil
1 Tbsp garlic, minced
1 Tbsp sambal oelek
Heat oil on medium heat, add garlic and ginger, heat through. Add onions and cook until clear (about 5 minutes). Add pork and cook through (5-10 minutes depending on the thickness of your pieces). Add tamarind and sambal oelek and coat everything thoroughly. Add carrots and cook one more minute.
Place cabbage evenly across the top of the pan. Cover tightly and simmer 10-15 minutes (depending on how crisp you want the cabbage to be). Mix well and serve.
I could pass this off as a Thai stir fry. Easy.
 Sambal Oelek Total time: 15 minutes.
Thicker than sauce, thinner than salsa, sambal oelek is a fresh-ground paste made of chili peppers, salt, and sometimes vinegar, lime juice, lemongrass, or brown sugar. The heat of the sambal depends entirely on the variety of peppers.
Most of the time, you just buy it in the grocery store (it’s that easy), and it lasts for up to 6 months in the refrigerator. You could probably keep it longer, but mine’s normally gone by the 3rd month.
4 Tbsp vinegar
1 cup of Thai chili peppers, chopped
1 tsp salt
1 clove of garlic (optional)
Puree.
Store securely for up to 6 months in the refrigerator.
Or buy it at the store for $1.19 a cup.
Total time: 25 minutes.
Not really a risotto, but you’ll see. This is a simple vegetarian style dish, that in this case is cooked in an electric rice steamer.
two cups of Thai style jasmine rice
one tablespoon of sliced garlic
one tablespoon of ground ginger
one tablespoon of chopped shallots (purple onions)
one table spoon of red prik ki nu (birdseye or dynamite chilis) sliced
one table spoon of green prik ki nu, sliced
A quantity of good chicken stock, equal to the volume of water specified by the rice cooker to cook two cups of rice, plus two tablespoons. (I normally use a normal sized can of chicken broth and 1 cup of water.)
Place the rice in the cooker.
Stir fry the other ingredients (except the stock)
Add all the ingredients to the cooker, and switch on.
When the cooking time is finished the dish is ready to serve.
(if you wish you can add a pinch of saffron or turmeric to colour the
rice yellow.)
Special thanks to – Muoi Khuntilanont.
 Served here with another spicy Thai dip and pork satay (with rice and spinach). Total time: 5 minutes.
3/4 cup coconut milk
4 Tbsp peanut butter
1 Tbsp lemon juice
1 Tbsp soy sauce
1 tsp brown sugar
1/2 tsp ground cumin
1/2 tsp ground coriander
1-2 dried red chilies, chopped (keep the seeds for heat)
Mix dry ingredients in a small bowl. Add soy sauce and lemon, mix well.
Over low heat, combine coconut milk, peanut butter and your soy-lemon-seasoning mix. Mix well, stir often. The peanut sauce literally takes 2 minutes to stir together on low heat (all you’re doing is melting the peanut butter, really), so make your peanut sauce after you’ve made everything else in your meal, or make ahead of time and reheat later.
 Use all the cloves!! Total time: 1 hour
Staple for Thai soup.
I use this in a lot of marinades and recipes.
One full head of garlic
2-3 cups of vegetable oil
Separate, peel and snip the ends of all the garlic cloves. Mash them up in your sturdy mortar and pestle or finely chop them in your food processor – both methods work. If you have time, there’s something to be said about the gratification in beating garlic in a mortar.
Caution! Turn on your overhead fan if you have one, or open the windows before you begin!
Fry in oil until golden brown (depending on how big your pile of garlic mash is, this could be one or two cups of oil!).
Pour garlic oil and remaining oil in a glass container for storage. Let cool completely before closing the lid. Keep up to 2 months. I keep mine in the cupboard next to my peanut oil and fish sauce.
|
|


